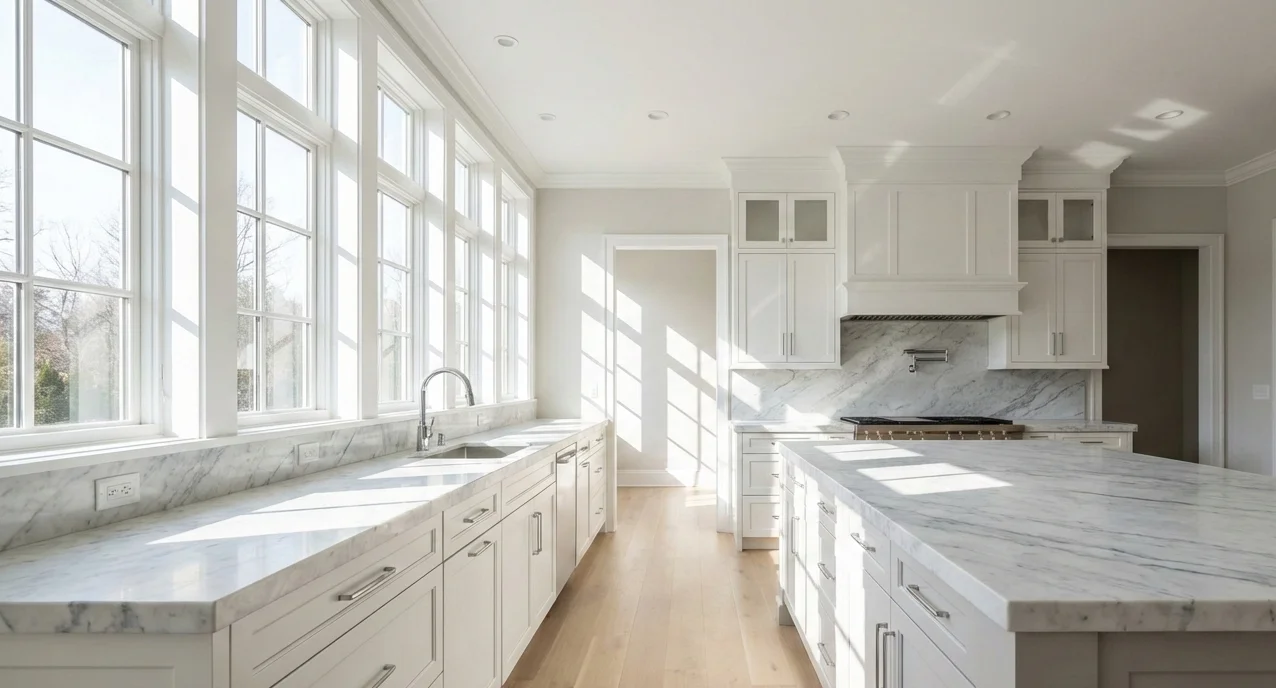
How to Take Before Photos for Your Kitchen Refresh
The first step of any kitchen refresh is documenting where you started. Good before photos aren't just for social media bragging rights, they help you appreciate the transformation, guide contractor conversations, and provide valuable documentation for insurance or resale.
Quick Summary
Time needed
20-30 minutes
Difficulty
Easy (anyone can do it)
Cost
Free
Why Before Photos Matter More Than You Think
Most people skip this step or take a few hasty phone snapshots. Then they finish their kitchen refresh, post a single after photo, and realize they can't remember what the hardware looked like before. Or worse, they need to show an insurance adjuster or real estate agent the improvement, and they have nothing to compare.
Taking 20 minutes now to document your kitchen properly will pay dividends later. Here's what good before photos enable:
- Transformation appreciation: You'll be amazed at how much you forget. Before photos bring the 'wow' factor back.
- Contractor communication: Show exactly what you want to change without guessing or relying on memory.
- Insurance documentation: If you ever need to prove improvements for a claim or appraisal.
- Resale value proof: Buyers and agents love seeing before-and-after documentation of upgrades.
- Project tracking: Useful if your refresh spans multiple weekends, you can see progress.
What You Need (Probably Already Have It)
You don't need fancy equipment. A smartphone made in the last 5 years will produce photos that are more than good enough. Here's your minimal kit:
Required
- Smartphone or digital camera
- Soft cloth to clean lens
- Note-taking app or paper
Nice to Have
- Phone tripod or stable surface
- Wide-angle lens attachment
- Remote shutter or timer
Step-by-Step: Taking Your Before Photos
1. Clean Your Lens (Seriously)
Your phone goes in and out of pockets, bags, and hands all day. The lens picks up fingerprints, dust, and smudges that create hazy, unflattering photos. Give it a quick wipe with a soft cloth or your shirt.
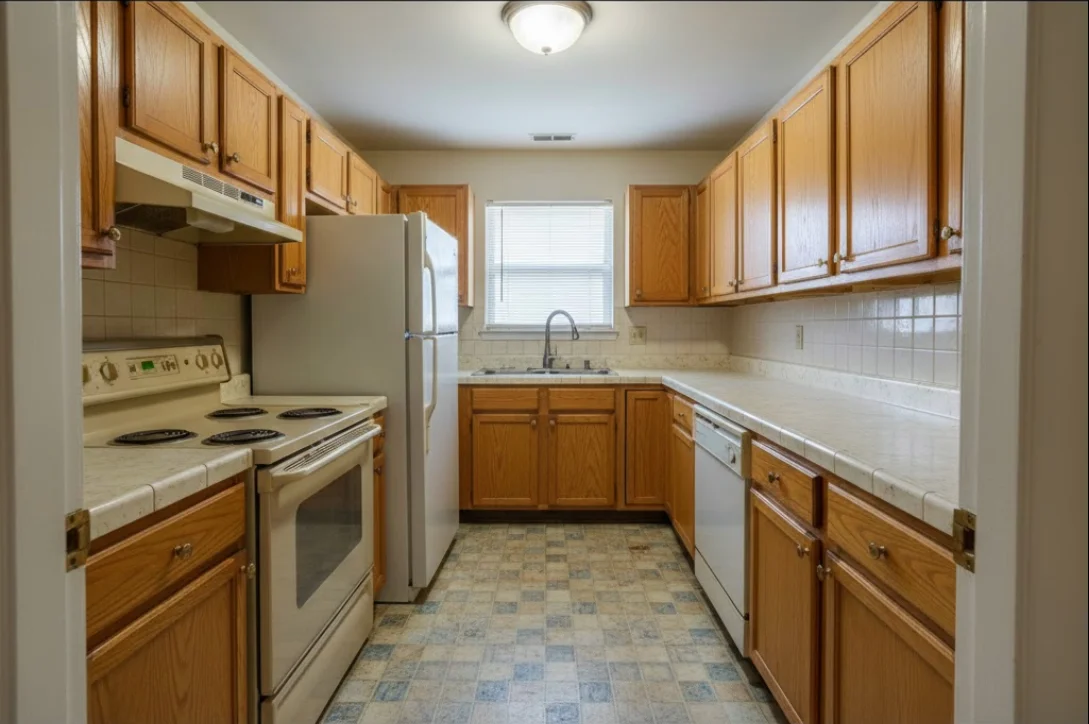
2. Declutter Minimally, Don't Stage
Remove obvious clutter: dirty dishes, trash, random mail piles. But don't go overboard. The point is to document the real state of your kitchen, not create a magazine shoot. Leave things like your toaster, knife block, and everyday items where they normally live.
Over-staging your before photos defeats the purpose and makes the eventual transformation less dramatic.
3. Choose the Right Time for Lighting
Lighting makes or breaks interior photos. The ideal time is early to mid-morning when natural light is soft and diffused.
Do This
- • Shoot in early/mid-morning
- • Open blinds and curtains
- • Turn off overhead lights (natural only)
- • Overcast days work great too
Avoid This
- • Night with only artificial lights
- • Harsh midday direct sunlight
- • Using your camera flash
- • Mixed lighting (some windows, some lamps)
Artificial lighting casts yellow or blue color tints that make everything look dated, even worse than it actually is. Stick with natural light for the most accurate colors.
4. Camera Settings and Technique
You don't need to be a photographer, but a few simple settings make a big difference:
5. Capture Your Wide Shots
These are the money shots for before-and-after comparisons. Take at least 4 wide photos from different positions:
The 4-Corner Method
Shot 1: Entry view
Stand in the doorway, capture what you see when entering
Shot 2: Opposite corner
Diagonally opposite from the entry
Shot 3: Sink wall
Standing opposite the sink, capture the whole wall
Shot 4: Range wall
Standing opposite the stove/range area
6. Capture Straight-On Wall Shots
In addition to corner shots, take a straight-on photo of each wall section. Face the wall directly, align your camera so the wall edges are parallel to the frame edges. These shots are especially useful for comparing specific areas like the backsplash or upper cabinets.
7. Take Close-Up Detail Shots
Now zoom in on the specific elements you're planning to change. These close-ups document the "before" state of individual features:
8. Document Open Cabinets (If Refinishing)
If you're painting cabinets or replacing hardware, open a few cabinet doors and photograph the interiors. This documents the existing finish condition and can be useful for matching paint or identifying problem areas.
9. Organize and Back Up Your Photos
Don't let your before photos get lost in your camera roll. Immediately after shooting:
- Create a dedicated album: "Kitchen Refresh - Before"
- Back up to cloud storage (Google Photos, iCloud, Dropbox)
- Add notes about camera positions for each shot
- Consider emailing yourself the best 10 shots as extra backup
Your Before Photo Checklist
Use this checklist to make sure you've captured everything. Aim for at least 15-20 photos total.
Common Mistakes to Avoid
Taking photos at night with all lights on
Why it's a problem: Creates unflattering yellow/blue color casts that make everything look worse
What to do instead: Wait for morning natural light, or at minimum turn off overhead fixtures
Only taking one or two wide shots
Why it's a problem: You can't recreate the exact angle later if you want a different comparison
What to do instead: Take multiple angles from each corner, better to have too many
Over-staging the before photos
Why it's a problem: Defeats the purpose of showing the real transformation
What to do instead: Light decluttering only; leave the space authentic
Forgetting to note camera positions
Why it's a problem: You won't be able to match the exact angle for after photos
What to do instead: Mark floor positions with tape or photograph your feet placement
Not backing up immediately
Why it's a problem: Photos can get deleted or lost in a massive camera roll
What to do instead: Create a dedicated album and cloud backup right after shooting
Frequently Asked Questions
What camera should I use for before photos?
A modern smartphone camera is perfectly adequate for before-and-after renovation photos. The key is consistency, use the same device for both before and after shots. If you have a DSLR or mirrorless camera, that works too, but it's not necessary.
What time of day is best for interior kitchen photos?
Early to mid-morning provides the best natural light for interior kitchen photos. The light is soft and diffused, avoiding harsh shadows. Avoid photographing at night with only artificial lights, as this can create unflattering yellow or blue color casts.
Should I clean my kitchen before taking before photos?
Minimally. Remove obvious clutter and trash, but don't deep clean or stage the space. The purpose of before photos is to document the authentic state of your kitchen. Over-staging defeats the purpose and makes the transformation less impactful.
How many before photos should I take?
Plan for at least 15-20 photos: 4 wide shots from each corner, 4 straight-on wall shots, close-ups of cabinets, hardware, countertops, appliances, and any problem areas. It's better to have too many than too few, you can't go back and retake them once you start.
Why is it important to take before photos?
Before photos serve multiple purposes: they help you appreciate the transformation when the project is complete, provide documentation for insurance or resale value, help contractors understand the starting point, and create compelling before-and-after content if you want to share your project.
Ready for the Next Step?
Now that you've documented your kitchen with before photos, it's time to clarify exactly what you want to change.